The Group Management page has a lot of features to make the management of groups easy for Group Leaders, so we are going to share a lot of information that is equally important for Group Leaders and for administrators to share going forward.
Group Information
When you log in and navigate to the Group Management page, the first thing you see is the group name or a drop-down list of all of the groups you are managing.
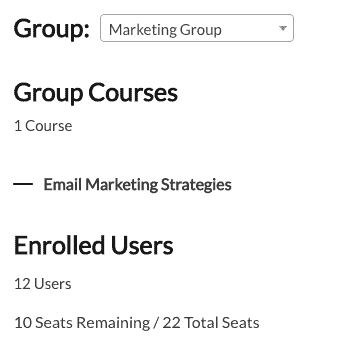
On the Group Management page, below the group heading and drop down list, you will see an indicator of seats remaining and total seats for the group you have currently selected, and a list of links to the courses associated with that Group. As groups change over time (seats are added, courses are added to groups, etc.) this information will be updated for quick reference.
Group Users
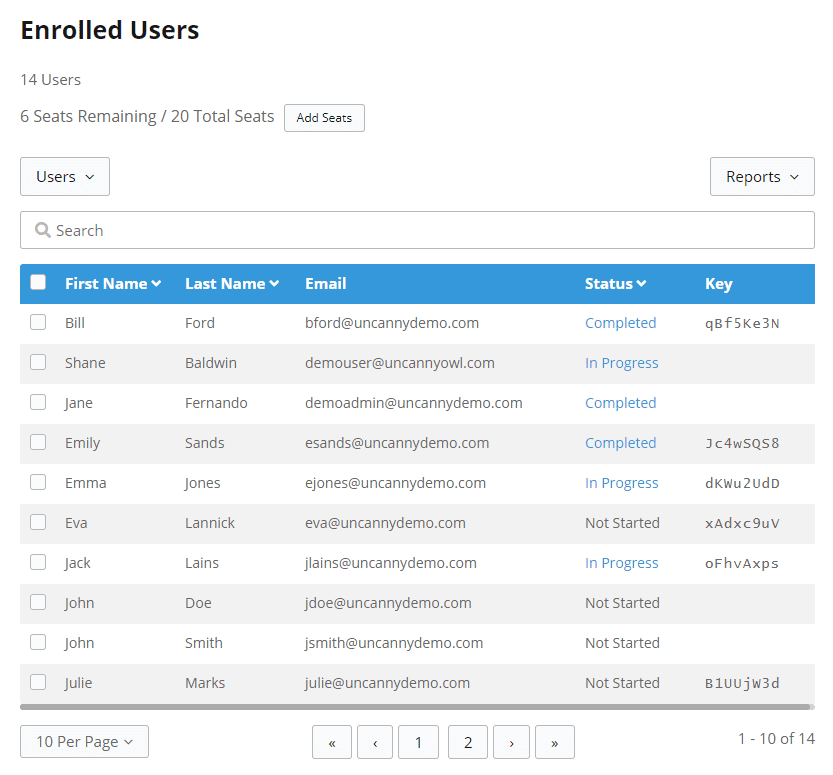
The next section of the page is the Enrolled Users list that contains two menus for the main management functions that are available to Group Leaders on the front end (see Fig. 2 below). The Enrolled Users list is the current list of your group users, their email addresses, their status, and their enrollment key (more user status below). Please ignore the Key, this system does not use Keys.
Adding Users to Group
When you click the Users menu, you can choose between adding one user or adding multiple users. If you select Add one, a form appears with two options:
- Add and invite user: Enter the user’s first name, last name, and email address to add them to a group. Once you click the Add User button, an email is sent to the user based on the email message settings set up by The IRG. The user is added to the list of users in the group and they take up a seat in your group, and their status is set to Not Started.
- If you add a user that already exists on the site, the system will add them to the group and send the Add and invite (existing user) email. They then occupy a seat in the group just like a new user.

What Users Receive
Users will receive an email that looks like this, with the proper information inserted at each hashtag.
Subject: On behalf of your organization, you are enrolled in a course provided by The IRG – time sensitive
Hi #FirstName,
On behalf of your organization, you are enrolled in the online course #Courses. To start your course, please go to The IRG at https://www.the-irg.ca/my-account/ and login using your email and the password included here.
Course: #Courses
Password: #Password
To change your password: https://www.the-irg.ca/my-account/edit-account/
Group Leader: #GroupLeaderInfo
Once you log in, you will see your Account page. Scroll down to see this course listed under My Courses. Click ‘Start’ and you will be taken to the course frontpage. From there, you’ll see the topics/lessons of the course. When you click on the first topic, the course will open up in a new box.
You may pause and continue the course at another time, and we suggest that you complete the online course within 10 days, or before the scheduled group webinar as the second part of this course. Please ensure that cookies are allowed for www.the-irg.ca or your course progress may not be tracked.
If you have any questions, please consult your Group Leader in your organization. If there are any technical issues accessing your course, please email The IRG at info@reconciliationgroup.ca.
Thank you for prioritizing your time for your own learning and development.
Adding Users in Bulk by CSV
Users can be added in bulk by clicking Users > Add multiple, or by clicking Users > Upload Users and uploading a CSV file.
The Upload Users form has options similar to those described above, with one major difference. When uploading a CSV file, you can choose not send an email to the list of users you are uploading. However, there is really no reason to use this option. A CSV file upload is simply another way to to input the information.
Always use the option “Add and Invite Users”.
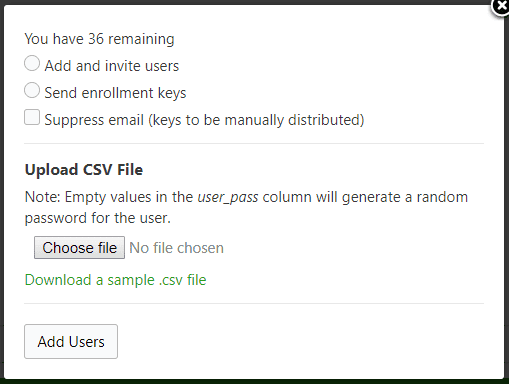
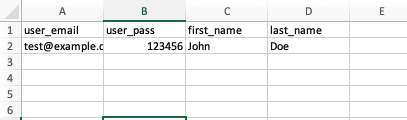
For the bulk upload to work properly, a CSV file formatted with the following column order and headings must be used: user_email; user_pass; first_name; last_name. CSV files that have incorrect formatting of email addresses, column names, etc will not be uploaded. Don’t worry about adding any user_pass passwords because a random password will be used, but the column heading should still be included.
Download a CSV template here:
If you click Users > Add multiple, the Bulk Add & Invite Users form appears.
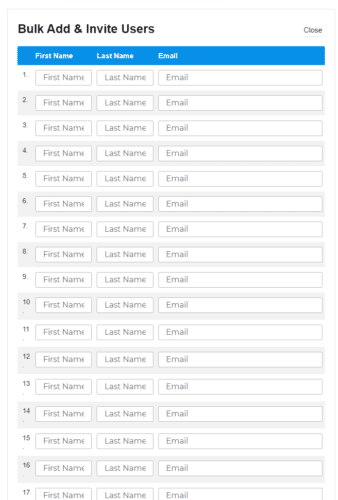
Users added to this form will receive an email based on the email message settings set up by the IRG. The users are added to the list of users in the group and they take up a seat in your group, and their status is set to Not Started.
Resetting User Passwords
To generate WordPress password reset emails for users that may have forgotten their passwords, select the user(s) from the list, and a Send password reset button will appear. Click Send password reset and the user will be emailed a link to reset their password.
Removing Users from Groups
To remove users from a group, select the users you would like to remove from the Enrolled User list, and a Remove User(s) button will appear. Click on the Remove User(s) button. You will be prompted to confirm your action.
Depending on the options set by your site administrator, you may only be able to remove group members before they have enrolled and begun their courses. Once a learner has begun completing the courses that are available in the group, or if they have completed all of the courses and their status is set to Completed, it may no longer be possible to remove them from the group.
Resetting User Passwords
To generate WordPress password reset emails for users that may have forgotten their passwords, select the user(s) from the list, and a Send password reset button will appear. Click Send password reset and the user will be emailed a link to reset their password.
Emailing Group Members
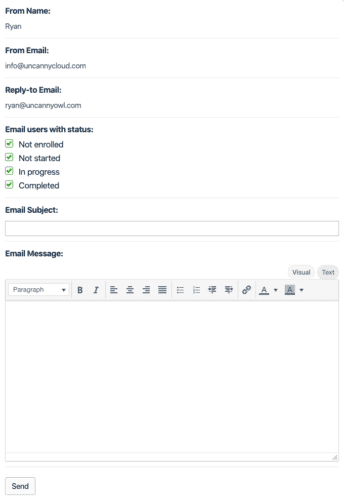
Group Leaders can easily email all members of their group based on their course status (Not enrolled, Not started, In progress and/or Completed). Clicking Users > Email Users brings up the email group members interface.
Emails sent via this interface use the Group Leader’s name as the From Name, the Group Leader’s email address as the Reply-to Email, and the From Email address in Uncanny Groups > Settings as the From Email. This is to reduce the likelihood that the emails are flagged as spam. Members are sent the email via BCC, so group members will not see each others’ email addresses.
Note that this feature is not available by default. The IRG must add this option to your group.
Adding Additional Group Leaders
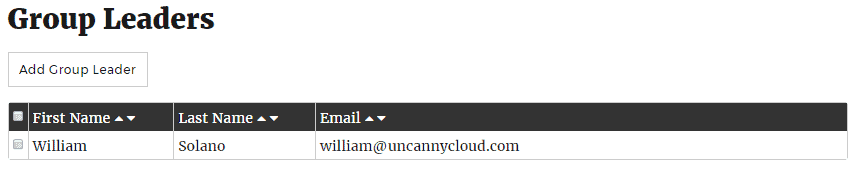
The lower section of the Group Management page is your Group Leaders list, and this list also has buttons located above it for adding, or sometimes removing, Group Leaders. Similar to the Enrolled Users list, the Group Leaders list displays the current Group Leaders by first name, last name, and email (see Fig. 5).
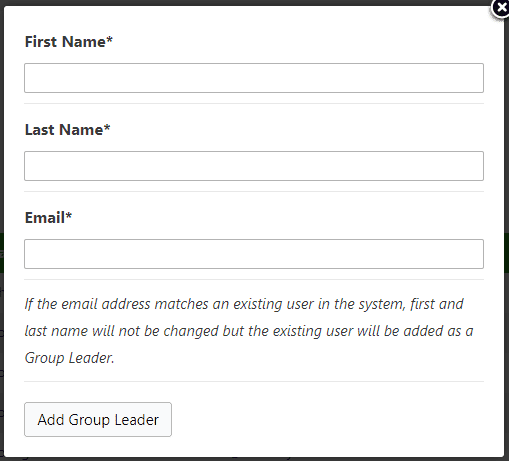
Adding more Group Leaders to your Group is even easier than adding users. Click the Add Group Leader button. Fill out the first name, last name, and email address of the person you would like to add. If you enter the email address of an existing user, the form will not alter the First Name and Last Name fields of that user, but will add them as a Group Leader, and send them a welcome email. If the user you added as Group Leader is new, they will be sent an email welcoming them to the site and the Group, as outlined in the email message settings set up by The IRG.
Removing Group Leaders
To remove a Group Leader, select the users you would like to remove from the Group Leaders list, and a Remove Group Leaders(s) button will appear. Click on the Remove Group Leaders(s) button. You will be prompted to confirm your action.
Group Leaders cannot remove themselves from the Group Leaders list. This must be done by another Group Leader.
Users, Seats, and Enrollment Keys
**** IMPORTANT – Enrollment keys are not used in The IRG learning system. This is included to show how group leaders versus users are tracked.
In order to track and manage your groups, as a Group Leader, it is important to consider the various ways that the status of a user, group seats, and enrollment keys change as users and Group Leaders are added and removed, and relative to the progress of users through group courses.
When groups are created using the plugin, it generates an enrollment key for each seat that is set for a group. In addition to that, each enrollment key that gets assigned or newly generated by adding seats, is a unique, one-time key. Whenever a new user or a new Group Leader is added to a group by sending them an enrollment key, they are expected to trigger their enrollment by redeeming the key. Once they do their status is changed from not enrolled to Not Started. Once they begin a course, their status is changed to In Progress.
In every case, when users or Group Leaders are added to groups, with or without using an enrollment key on the front end, a seat and key are automatically taken for each user and that seat remains occupied regardless of their enrollment and course completion status.
For example, if your admin creates a group with 15 seats and assigns you as a Group Leader, you are assigned an enrollment code in the background and you occupy 1 seat in that group. When you log in and look at your group via the Group Management Page, you will see that the remaining seats in your Group are now 14. As an existing user, you will already be enrolled and have secured a seat in the Group and your status will be set to Not Started.
Please take a close look at the following table that outlines user status and the status of enrollment keys.
| Group Member Status | Description | Redemption Key Status |
|---|---|---|
| Not Enrolled | An enrollment code was sent to the specified email address. | Available |
| Not Started | The user has enrolled but not yet started any courses | Available |
| In Progress | The user has started at least one of the group’s courses | Used |
| Completed | The user has completed all courses assigned to the group | Used |
Adding Additional Seats and Courses to an Existing Group License
Group Leaders may see Add Seats and Add Courses buttons on the Group Management page. Additional charges may apply per seat.

Adding Courses
The Add Courses button is only available if the group was created through the Custom Group License process. It is not available for pre-configured licenses or for groups manually created by an administrator. Clicking Add Courses takes the Group Leader back to the Buy Courses form (see Fig. 1 above) to select and purchase the courses to be added to the group. Group Leaders will not be able to remove or reselect the courses that already in the group license.
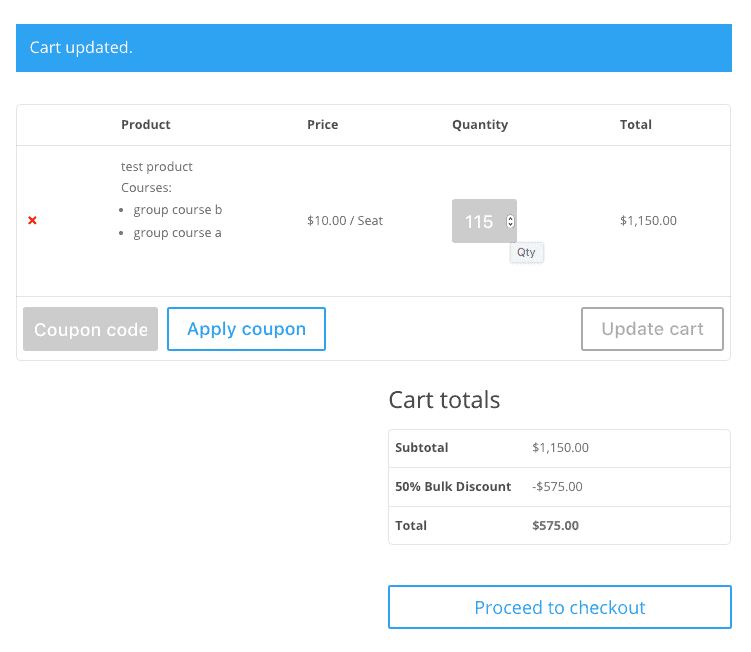
Adding Seats
The Add Seats button is only available if the group was created through the Custom Group License process or through the purchase of a pre-configured, non-subscription license. It is not available for groups manually created by The IRG (The IRG can add seats manually upon request). Clicking Add Seats will take the Group Leader back to the cart page to increase the number of seats in the group (see Fig. 4 below). In the cart, the number of seats in the cart will be the current number of seats in the group, plus one. The Group Leader can then increase the quantity to the desired total number of seats and click Update Cart. The total due is calculated from the cost of the new seats, a discount for the seats already purchased, plus any applicable bulk discounts. When the order is completed, the additional seats are added to the group.